如題,H1下方的三鍵實在不靈敏.
加入虛擬按鍵的方式如下:
1.手機需取得Root權限。
2.使用"ES檔案瀏覽器",並開啟"Root工具箱".
3.在ROOT根目錄下,開啟system文件夾內build.prop的文件.
4.編輯build.prop,在最後一行加入qemu.hw.mainkeys=0
5.儲存修改的設定並重開機即可.
6.若需要取消虛擬按鍵,把qemu.hw.mainkeys=0更改為qemu.hw.mainkeys=1
2015年11月11日 星期三
2015年7月9日 星期四
[Ubuntu]Test your Ubuntu computer. Ubuntu燒機軟體
安裝stress測試工具指令:
sudo apt-get install stress
stress測試項目如下:
CPU的指令參數 -c
記憶體指令參數 -m
硬碟指令參數 -d
測試時間指令參數 -t
測試1個CPU線程
stress -c 1
測試4個CPU線程
stress -c 4
使用3個程序來測試記憶體,預設1個程序為250MB(總共750MB)
stress -m 3
使用3個程序來測試記憶體,每個程序為500MB (等於1.5G的Ram)
stress -m 3 --vm-bytes 500M
使用1個程序來測試硬碟存取,預設1個程序為1GB資料存取
stress -d 1
使用2個程序來測試硬碟存取,並設定每1個程序為512MB資料存取(總共1GB)
stress -d 2 --hdd-bytes 512M
燒機測試使用4線程CPU、2個程序測試記憶體、1個程序來測試硬碟存取
stress -c 4 -m 2 -d 1
設定測試時間為一小時
stress -c 4 -m 2 -d 1 -t 3600s
stress -c 4 -m 2 -d 1 -t 60M
[Ubuntu] install ARP-scan
install arp-scan command:
sudo apt-get install arp-scan
arp-scan command:
sudo arp-scan --interface=eth0 192.168.168.0/24
or
sudo arp-scan 192.168.168.0/24
2015年5月23日 星期六
[Ubuntu]Ubuntu15.04的fcitx輸入法安裝嘸蝦米(boshiamy)
14.04以前的安fcitx輸入法:
sudo apt-get install fcitx
sudo apt-get install im-config
sudo add-apt-repository ppa:fcitx-team/nightly
sudo apt-get update
im-config
-------------------------------------------------------------------
嘸蝦米套件:
sudo apt-get install fcitx-table-boshiamy
新酷音:
sudo apt-get install fcitx-chewing
向ibus說byebye~~~~
sudo apt-get remove ibus
sudo apt-get install unity-control-center
2015年5月22日 星期五
Ubuntu 14.04.2 Server + BIND DNS Server + SIP DNS SRV settings
step 1.
Download Ubuntu Server 14.04.2 and install this system.
http://www.ubuntu.com/download/server
Installation process
To select the “DNS Server” service function.
step 2.
Install Webmin On Ubuntu 14.04 LTS using official repository
step 3.
使用 Webmin方式來設定DNS Server
設定 Bind 8 可以接受外部連線及轉送查詢的伺服器。
forwarders {
163.168.168.59; //base DNS IP
8.8.8.8; //google DNS IP
};
allow-query {
any;
};

設定區域預設值

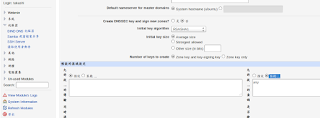
建立一個新的主控區域-正向
輸入管理網域名稱 test.local

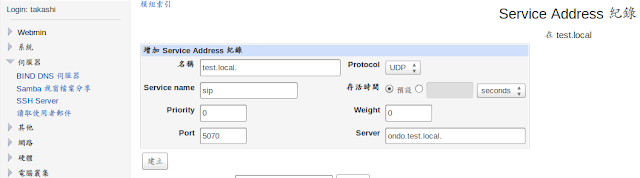
建立 Address 紀錄(位址)

增加 Address 紀錄
step 4.
使用nslookup指令查詢
nslookup
server "DNS Server IP"
set type=srv
_sip._udp.test.local

Download Ubuntu Server 14.04.2 and install this system.
http://www.ubuntu.com/download/server
Installation process
To select the “DNS Server” service function.
step 2.
Install Webmin On Ubuntu 14.04 LTS using official repository
Add the webmin official repository:
Edit file /etc/apt/sources.list,
sudo nano /etc/apt/sources.list
Add the following lines:
deb http://download.webmin.com/download/repository sarge contrib
deb http://webmin.mirror.somersettechsolutions.co.uk/repository sarge contrib
Add the GPG key:
sudo wget http://www.webmin.com/jcameron-key.asc
sudo apt-key add jcameron-key.asc
Update the sources list:
sudo apt-get update
Install webmin using the following command:
sudo apt-get install webmin
Allow the webmin default port “10000” via firewall, if you want to access the webmin console from a remote system.
sudo ufw allow 10000
Access Webmin console
Open up your browser and navigate to the URL https://ip-address:10000/. The following screen should appear. Enter the user name and password to log in to webmin console.
step 3.
使用 Webmin方式來設定DNS Server
設定 Bind 8 可以接受外部連線及轉送查詢的伺服器。
「伺服器」->「BIND 8 DNS 伺服器」->「Edit Config File」->/etc/bind/named.conf.options 在此檔中加入 listen-on port 53 { any; }; forwarders {
163.168.168.59; //base DNS IP
8.8.8.8; //google DNS IP
};
allow-query {
any;
};

設定區域預設值
「伺服器」->「BIND 8 DNS 伺服器」->「區域預設值」 「預設的區域設定」->「允許從 ... 的查詢」點擊「監聽」及輸入 [any]
建立一個新的主控區域-正向
輸入管理網域名稱 test.local

建立 Address 紀錄(位址)

增加 Address 紀錄

step 4.
使用nslookup指令查詢
nslookup
server "DNS Server IP"
set type=srv
_sip._udp.test.local

2015年3月25日 星期三
[office] libreoffice Calc 工作表字體太小
修改主题的gtkrc文件。
比如:
sudo gedit /usr/share/themes/elementary/gtk-2.0/gtkrc
找到GtkScrollbar ::slider-width,
修改成適合的值。
如原先是6,我改為18後.儲存檔案退出,
重新開啟libreoffice Calc,此時下方的工作表字體便會放大。
比如:
sudo gedit /usr/share/themes/elementary/gtk-2.0/gtkrc
找到GtkScrollbar ::slider-width,
修改成適合的值。
如原先是6,我改為18後.儲存檔案退出,
重新開啟libreoffice Calc,此時下方的工作表字體便會放大。
| style "murrine-default" { GtkScrollbar ::has-backward-stepper = 0 GtkScrollbar ::has-forward-stepper = 0 GtkScrollbar ::min-slider-length = 30 GtkScrollbar ::slider-width = 18 GtkScrollbar ::trough-border = 1 |
2015年3月4日 星期三
[Ubuntu] Install Intel Graphics Installer ver 1.0.7 in 14.10.
Intel(R) Graphics Installer for Linux* 1.0.7
https://01.org/linuxgraphics/downloads/2014/intelr-graphics-installer-linux-1.0.7“Distribution not supported” in 14.10
That software checks
/etc/lsb-release and that is a text file we can edit ourself so it might be fairly easy to circumvent. Make a backup first though if you do not know what this means. From a command line:sudo cp /etc/lsb-release /etc/lsb-release.backup
And then edit the file ...
sudo gedit /etc/lsb-release
And change the lines that look like
DISTRIB_RELEASE=14.10
DISTRIB_CODENAME=utopic
with ...
DISTRIB_RELEASE=14.04
DISTRIB_CODENAME=trusty
And save it. Start the installation and it should finish this time without a notice regarding the distribution.
After that you can then put back the backup file with (
cp to leave the backup, change it to mv to also remove the backup)...sudo cp /etc/lsb-release.backup /etc/lsb-release ============================================================================
Instructions for 32 bit systems:
$ wget --no-check-certificate https://download.01.org/gfx/RPM-GPG-KEY-ilg -O - | sudo apt-key add -

$ sudo apt-get update

$ wget
https://download.01.org/gfx/ubuntu/14.04/main/pool/main/i/intel-linux-graphics-installer/intel-linux-graphics-installer_1.0.7-0intel1_i386.deb

$ sudo gdebi intel-linux-graphics-installer_1.0.7-0intel1_i386.deb
Instructions for 64 bit systems:
$ wget --no-check-certificate https://download.01.org/gfx/RPM-GPG-KEY-ilg -O - | sudo apt-key add -

$ sudo apt-get update

$ wget
https://download.01.org/gfx/ubuntu/14.04/main/pool/main/i/intel-linux-graphics-installer/intel-linux-graphics-installer_1.0.7-0intel1_amd64.deb

$ sudo gdebi intel-linux-graphics-installer_1.0.7-0intel1_amd64.deb
To start the Intel Linux Graphics Installer, on both 32 bit and 64 bit Ubuntu systems, open a terminal and type:$ sudo intel-linux-graphics-installer 2015年1月9日 星期五
[Network]IPv6 Support for Http File Server (HFS)
If you want to have access to HFS site via IPV6 you can use next hack:
1. Download relay6 from http://sourceforge.net/projects/relay6/files/
2. Unpack to some folder (e.g. C:\relay6)
3. Start it with next command from cmd
1. Download relay6 from http://sourceforge.net/projects/relay6/files/
2. Unpack to some folder (e.g. C:\relay6)
3. Start it with next command from cmd
| C:\>C:\relay6\relay6.exe 80 127.0.0.1 80 /b:"YourIPv6 Address" |
2015年1月7日 星期三
[Ubuntu]ACER TravelMate 3000 Wubi install Ubuntu 14.04.1
1.開始->執行->cmd
指令輸入convert c: /fs:ntfs
指令輸入convert c: /fs:ntfs
C:從FAT32轉到NTFS
2.下载ubuntu-14.04.1-desktop-i386.iso
3.掛載該ISO檔
4.win+R 執行“X:\wubi.exe --force-wubi --32bit“
5.進入WUBI安裝程序
6.安裝完成後,進入Ubuntu啟動選單時,選擇 *Ubuntu 後,按鍵盤上的 E 鍵,進入啟動編輯模式
7.
把ro 改成 rw 後,按 F10 鍵,便可修改參數進入系統loop=/ubuntu/disks/root.disk ro loop=/ubuntu/disks/root.disk rw
8.進入系統後,Ctrl + T
輸入 sudo gedit /etc/grub.d/10_lupin
9.gedit 編輯下搜尋 ro ${args} 字串
並把ro 改成 rw 後,儲存離開。
10.輸入 sudo update-grub 後,即可重新開機。
訂閱:
意見 (Atom)