Ubuntu 22.04 install rtl88x2bu driver:
sudo apt update
sudo apt install git dkms build-essential
git clone https://github.com/cilynx/rtl88x2bu.git
cd rtl88x2bu
VER=$(sed -n 's/\PACKAGE_VERSION="\(.*\)"/\1/p' dkms.conf)
sudo rsync -rvhP ./ /usr/src/rtl88x2bu-${VER}
sudo dkms add -m rtl88x2bu -v ${VER}
sudo dkms build -m rtl88x2bu -v ${VER}
sudo dkms install -m rtl88x2bu -v ${VER}
sudo modprobe 88x2bu
2023年11月26日 星期日
2022年12月2日 星期五
老毛子Padavan 印表機分享(HP1020)
下載HP1020驅動並上傳至路由器,
http://oleg.wl500g.info/hplj/

或是telent至路由器,wget去下載HP1020驅動至 /etc/storage/。
wget http://oleg.wl500g.info/hplj/sihp1020.dl
編輯腳本,添加下面這一行‧
cat /etc/storage/sihp1020.dl > /dev/usb/lp0

2015年7月9日 星期四
[Ubuntu] install ARP-scan
install arp-scan command:
sudo apt-get install arp-scan
arp-scan command:
sudo arp-scan --interface=eth0 192.168.168.0/24
or
sudo arp-scan 192.168.168.0/24
2015年5月22日 星期五
Ubuntu 14.04.2 Server + BIND DNS Server + SIP DNS SRV settings
step 1.
Download Ubuntu Server 14.04.2 and install this system.
http://www.ubuntu.com/download/server
Installation process
To select the “DNS Server” service function.
step 2.
Install Webmin On Ubuntu 14.04 LTS using official repository
step 3.
使用 Webmin方式來設定DNS Server
設定 Bind 8 可以接受外部連線及轉送查詢的伺服器。
forwarders {
163.168.168.59; //base DNS IP
8.8.8.8; //google DNS IP
};
allow-query {
any;
};

設定區域預設值

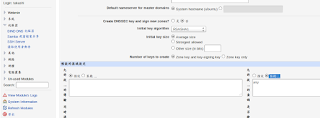
建立一個新的主控區域-正向
輸入管理網域名稱 test.local

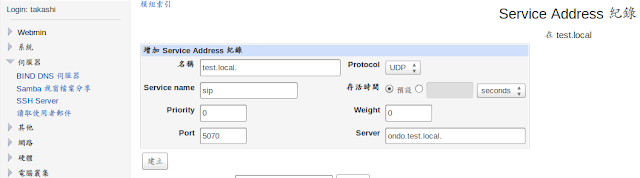
建立 Address 紀錄(位址)

增加 Address 紀錄
step 4.
使用nslookup指令查詢
nslookup
server "DNS Server IP"
set type=srv
_sip._udp.test.local

Download Ubuntu Server 14.04.2 and install this system.
http://www.ubuntu.com/download/server
Installation process
To select the “DNS Server” service function.
step 2.
Install Webmin On Ubuntu 14.04 LTS using official repository
Add the webmin official repository:
Edit file /etc/apt/sources.list,
sudo nano /etc/apt/sources.list
Add the following lines:
deb http://download.webmin.com/download/repository sarge contrib
deb http://webmin.mirror.somersettechsolutions.co.uk/repository sarge contrib
Add the GPG key:
sudo wget http://www.webmin.com/jcameron-key.asc
sudo apt-key add jcameron-key.asc
Update the sources list:
sudo apt-get update
Install webmin using the following command:
sudo apt-get install webmin
Allow the webmin default port “10000” via firewall, if you want to access the webmin console from a remote system.
sudo ufw allow 10000
Access Webmin console
Open up your browser and navigate to the URL https://ip-address:10000/. The following screen should appear. Enter the user name and password to log in to webmin console.
step 3.
使用 Webmin方式來設定DNS Server
設定 Bind 8 可以接受外部連線及轉送查詢的伺服器。
「伺服器」->「BIND 8 DNS 伺服器」->「Edit Config File」->/etc/bind/named.conf.options 在此檔中加入 listen-on port 53 { any; }; forwarders {
163.168.168.59; //base DNS IP
8.8.8.8; //google DNS IP
};
allow-query {
any;
};

設定區域預設值
「伺服器」->「BIND 8 DNS 伺服器」->「區域預設值」 「預設的區域設定」->「允許從 ... 的查詢」點擊「監聽」及輸入 [any]
建立一個新的主控區域-正向
輸入管理網域名稱 test.local

建立 Address 紀錄(位址)

增加 Address 紀錄

step 4.
使用nslookup指令查詢
nslookup
server "DNS Server IP"
set type=srv
_sip._udp.test.local

2015年1月9日 星期五
[Network]IPv6 Support for Http File Server (HFS)
If you want to have access to HFS site via IPV6 you can use next hack:
1. Download relay6 from http://sourceforge.net/projects/relay6/files/
2. Unpack to some folder (e.g. C:\relay6)
3. Start it with next command from cmd
1. Download relay6 from http://sourceforge.net/projects/relay6/files/
2. Unpack to some folder (e.g. C:\relay6)
3. Start it with next command from cmd
| C:\>C:\relay6\relay6.exe 80 127.0.0.1 80 /b:"YourIPv6 Address" |
2014年12月23日 星期二
[Proxmox] 無法更新 apt-get update error
Proxmox VE 3.x
| apt-get update |
| Failed to fetch https://enterprise.proxmox.com/debian/dists/wheezy/pve-enterprise/binary-amd64/Packages The requested URL returned error: 401 Some index files failed to download. They have been ignored, or old ones used instead. |
| cat /etc/apt/sources.list.d/pve-enterprise.list |
| deb https://enterprise.proxmox.com/debian wheezy pve-enterprise |
編輯pve-enterprise.list,並在路徑前加入“#”
| nano /etc/apt/sources.list.d/pve-enterprise.list |
| # deb https://enterprise.proxmox.com/debian wheezy pve-enterprise |
編輯sources.list,
並加入deb http://download.proxmox.com/debian wheezy pve-no-subscription
| nano /etc/apt/sources.list |
deb http://ftp.debian.org/debian wheezy main contrib # PVE pve-no-subscription repository provided by proxmox.com, NOT recommended for production use deb http://download.proxmox.com/debian wheezy pve-no-subscription # security updates deb http://security.debian.org/ wheezy/updates main contrib |
網頁按下Refresh, 下方便出現可更新項目元件。

2014年12月22日 星期一
[DIY] DIY passive ethernet tap
使用三個RJ-45接頭,
兩個的8Pin的RJ45平行對焊~~~
另外一個頭,只需要2Pin,
分別搭在8Pin的RJ45接頭第三和第六腳位。

搭配Switch使用,Host兩端分別接上網路設備及Switch,
Tap端連接PC,此時開啟Wireshark即可攔封包。

兩個的8Pin的RJ45平行對焊~~~
另外一個頭,只需要2Pin,
分別搭在8Pin的RJ45接頭第三和第六腳位。

搭配Switch使用,Host兩端分別接上網路設備及Switch,
Tap端連接PC,此時開啟Wireshark即可攔封包。
2014年12月19日 星期五
[Ubuntu] Ubuntu-MATE 14.10 install XRDP
Install XRDP command:
sudo apt-get install xrdp
MATE Desktop Interface:
sudo apt-get update
sudo apt-get install mate-core mate-desktop-environment mate-notification-daemon
echo mate-session >~/.xsession
sudo service xrdp restart
xfce Desktop Interface:
sudo apt-get update
sudo apt-get install xfce4
echo xfce4-session >~/.xsession
sudo service xrdp restart
LXDE Desktop Interface:
sudo apt-get update
sudo apt-get install lxde
echo lxsession -s LXDE -e LXDE > ~/.xsession
sudo service xrdp restart
2014年11月4日 星期二
[Linux] Zeroshell RADIUS server + 802.1x Switch + SIP Phone
1. Zeroshell RADIUS server:
------------------------------------------------------------------------------
2. Switch Seting 802.1X :
--------------------------------------------------------------------------------
3. IP Phone Seting 802.1X :

SIP Phone setting
Switch :Enable
EAP Method:PEAP or TTLS
Username:admin (default)
Password:zeroshell (default)
---------------------------------------------------------------------------------
Zeroshell RADIUS server ISO :
http://www.zeroshell.org/download/
 | |
| login username:admin/password:zeroshell |
 |
| select RADIUS |
 |
| add switch Name / IP address / Secret |
------------------------------------------------------------------------------
2. Switch Seting 802.1X :
 |
| setting RADUIS Server IP / Port / Secret |
--------------------------------------------------------------------------------
3. IP Phone Seting 802.1X :
SIP Phone setting
Switch :Enable
EAP Method:PEAP or TTLS
Username:admin (default)
Password:zeroshell (default)
---------------------------------------------------------------------------------
Zeroshell RADIUS server ISO :
http://www.zeroshell.org/download/
2014年10月27日 星期一
[Ubuntu] Wireshark no interface
sudo groupadd wireshark
sudo chgrp wireshark /usr/bin/dumpcap
sudo chmod 4754 /usr/bin/dumpcap
sudo usermod -a -G wireshark takashi
id takashi
#id takashi check group.reboot
-------------------------------------------------------
Upgrade to 1.8.2
To install the PPA, run the following command:
sudo add-apt-repository ppa:eugenesan/ppa
then run
sudo apt-get install wireshark
[Ubuntu]ubuntu 共享印表機 給 WINDOWS XP/7 使用
Ubuntu本機上新增印表機後,
就可以修改 smb.conf
sudo gedit /etc/samba/smb.conf
找到 ";security = user"
改成
security = share
改成
security = share
reboot,然後在XP端,新增網絡印表機就可以找到了~
PS:記得,要先安裝samba.
[Ubuntu]架IPv6 DHCP Server
sudo apt-get install isc-dhcp-server
1. set a static IPv6 address for the Interface I want to run the DHCPv6 server from that is part of the IPv6 network subnet outside the DHCP range.
2. Edit the /etc/dhcp/dhcpd6.conf file to configure the DHCPv6 range etc.
3. Create the /var/lib/dhcp/dhcpd6.leases
4. Manually start the DHCPv6 server.
----------------------------------------------------------------------------
sudo ifconfig eth0 inet6 add 2001:db8:0:1::128/64
[ configure dhcpd6.conf ]
default-lease-time 600;
max-lease-time 7200;
log-facility local7;
subnet6 2001:db8:0:1::/64
{
#Range for clients
range6 2001:db8:0:1::129 2001:db8:0:1::254;
}
max-lease-time 7200;
log-facility local7;
subnet6 2001:db8:0:1::/64
{
#Range for clients
range6 2001:db8:0:1::129 2001:db8:0:1::254;
}
touch /var/lib/dhcp/dhcpd6.leases
chown dhcpd:dhcpd /var/lib/dhcp/dhcpd6.leases
sudo dhcpd -6 -f -cf /etc/dhcp/dhcpd6.conf eth0
****************************************************
Can't open /var/lib/dhcp/dhcpd6.leases for append.
sudo chmod 666 /var/lib/dhcp/dhcpd6.leases
[ubuntu]Install TFTP Server
sudo apt-get install tftpd-hpa tftp-hpa
sudo gedit /etc/default/tftpd-hpa
####################
#Defaults for tftpd-hpa
TFTP_USERNAME="root"
TFTP_DIRECTORY="/home/takashi/tftpboot"
TFTP_ADDRESS="0.0.0.0:69"
TFTP_OPTIONS="-l -s -c --secutre"
####################
PS:/home/takashi/tftpboot 需要自已新增目錄
sudo mkdir /home/takashi/tftpboot
sudo chmod 777 /home/takashi/tftpboot
sudo service tftpd-hpa start
在Ubuntu上面直接裝的TFTP server套件不會在開機時執行,精確一點說應該是開機時跑了卻沒有起來。
這是個老毛病,修一下就好。
編輯 /etc/init/tftpd-hpa.conf ,修改它錯誤的初始條件。
#start on runlevel [2345] # the original line which is wrong
start on (filesystem and net-device-up IFACE!=lo)
編輯 /etc/init/tftpd-hpa.conf ,修改它錯誤的初始條件。
#start on runlevel [2345] # the original line which is wrong
start on (filesystem and net-device-up IFACE!=lo)
[Linux]Lubuntu install Xrdp
sudo apt-get install xrdp
echo 'lxsession' > .xsession
sudo apt-get install xvfb lxde
sudo service xrdp restart
sudo apt-get install xvfb lxde
sudo service xrdp restart
[Linux] ubuntu install telnet service
ubuntu安装telnet服务
1. sudo apt-get install xinetd telnetd
sudo gedit /etc/inetd.conf并加入以下一行,假如没有发现这个文件,
自己新建立一个也是可以的.
------------------------------------------------------------------------------------------------------------
------------------------------------------------------------------------------------------------------------
telnet stream tcp nowait telnetd /usr/sbin/tcpd /usr/sbin/in.telnetd
------------------------------------------------------------------------------------------------------------
3. sudo gedit /etc/xinetd.conf并加入以下内容:
------------------------------------------------------------------------------------------------------------
------------------------------------------------------------------------------------------------------------
# Simple configuration file for xinetd
#
# Some defaults, and include /etc/xinetd.d/
defaults
{
# Please note that you need a log_type line to be able to use log_on_success
# and log_on_failure. The default is the following :
# log_type = SYSLOG daemon info
instances = 60
log_type = SYSLOG authpriv
log_on_success = HOST PID
log_on_failure = HOST
cps = 25 30
}
------------------------------------------------------------------------------------------------------------
4. sudo gedit /etc/xinetd.d/telnet并加入以下内容:
------------------------------------------------------------------------------------------------------------
# default: on
# description: The telnet server serves telnet sessions; it uses
# unencrypted username/password pairs for authentication.
service telnet
{
disable = no
flags = REUSE
socket_type = stream
wait = no
user = root
server = /usr/sbin/in.telnetd
log_on_failure += USERID
}
------------------------------------------------------------------------------------------------------------
5. 重启机器或重启网络服务
sudo /etc/init.d/xinetd restart
sudo /etc/init.d/xinetd restart
[Linux]Pure-FTPD + pureadmin
Install ''Pure-FTPD'' with GUI
1. Install the pure-ftpd package and the pureadmin package from the Universe Repository.
sudo apt-get install pure-ftpd pureadmin
2.新增虛擬使用者所要對應的系統使用者(ftpuser)與其家目錄
sudo adduser --system --home /home/ftpuser --shell /dev/null --disabled-password --disabled-login ftpuser
3.新增虛擬使用者
sudo pure-pw useradd user01 -u ftpuser -d /home/ftpuser
如果要不同使用者有不同家目錄需在 -d 指定且新增其家目錄, 如
sudo mkdir /home/ftpuser/joe; sudo chown -R ftpuser /home/ftpuser/joe
sudo pure-pw useradd joe -u mis91 -d /home/ftpuser/joe
預設會新增在 /etc/pure-ftpd/pureftpd.passwd 中,或使用 pure-pw -f your.passwd.file 指定
4.建立 db 並確認 /etc/pure-ftpd/conf/PureDB 中資料為 /etc/pure-ftpd/pureftpd.pdb
sudo pure-pw mkdb /etc/pure-ftpd/pureftpd.pdb -f /etc/pure-ftpd/pureftpd.passwd
加入 DB 認証模式至設定中
sudo ln -s /etc/pure-ftpd/conf/PureDB /etc/pure-ftpd/auth/45puredb
5.確認幾項設定
* 確認 cat /etc/pure-ftpd/conf/UnixAuthentication 中指有字串 no
* 確認 cat /etc/pure-ftpd/conf/MinUID 中的數值比 ftpuser 的 UID 還小(如: adduser --system 的 UID 通常會預設值) , 不然虛擬帳號無法登入
6.重新啟動 pure-ftpd service
sudo /etc/init.d/pure-ftpd restart
============================================================
其他常用到的幾個設定,檔案都需寫在 /etc/pure-ftpd/conf 下
* ) echo "yes" > ChrootEveryone (使用者被限制在家目錄下)
* ) echo "no" > PAMAuthentication (不使用 PAM 認証:一般用者無法用 pure-ftpd 登入)
*) echo ",9188" > Bind (設定 ip/port )
* ) echo "yes" > KeepAllFiles (這個應該是不允許用戶端刪除文件)
* ) echo "yes" >DontResolve (不解釋主機名,可以加快登錄速度)
設定允許 symbolic links :
1) 編輯 /etc/default/pure-ftpd-common
將 VIRTUALCHROOT=false 改為 VIRTUALCHROOT=true
2) Restart service
設定允許 匿名登入
1) echo "no" > /etc/pure-ftpd/conf/NoAnonymous
2) sudo adduser --system --home /home/ftpuser --shell /sbin/nologin --disabled-password --disabled-login ftp
3) Restart service
設定 Passive mode
1) echo "29799 29899" > /etc/pure-ftpd/conf/PassivePortRange
設定最多 clients 數量
1) echo "50" > /etc/pure-ftpd/conf/MaxClientsNumber
[Linux]set ubuntu route default gw
方式1:
直接編輯網路連線檔案。
sudo gedit /etc/NetworkManager/system-connections/有線網路連線\ 1
#設定default gw的參數,false=設定gw,true=取消gw,
never-default=false
方式2:
編輯route
route
sudo route del default gw <gatway ip> eth0
sudo route add default gw <gatway ip> eth1
直接編輯網路連線檔案。
sudo gedit /etc/NetworkManager/system-connections/有線網路連線\ 1
#設定default gw的參數,false=設定gw,true=取消gw,
never-default=false
方式2:
編輯route
route
sudo route del default gw <gatway ip> eth0
sudo route add default gw <gatway ip> eth1
[Linux]Fix Lubuntu / Xubuntu 14.04 Network Manager Missing From The Panel
Lubuntu 14.04: fix 1
To fix the Network Manager not showing up on the panel issue, from the Lubuntu menu select Preferences > Default applications for LXSession, then click on the Autostart tab and under "Manual autostarted applications" type "nm-applet", then click the "+ Add" button on the left:
If the above solution didn't work for you in Lubuntu 14.04 or if you're using Xubuntu 14.04 and you're having this issue, here's another solution. Basically, the solution below is for those who must run "nm-applet" as root to get it to show up in the pane - we'll be using dbus-launch to launch nm-applet at startup.
To get the Network Manager applet to work properly in either Lubuntu 14.04 or Xubuntu 14.04, run the following command:
sudo sed -i 's/Exec=nm-applet/Exec=dbus-launch nm-applet/' /etc/xdg/autostart/nm-applet.desktop
[Ubuntu]Create VLAN in Ubuntu Linux
1. Install the vlan package using apt-get tool
· sudo apt-get install vlan
2. Load the Vlan (802.1q) module
· modprobe 8021q
· echo 8021q >> /etc/modules
3. Add vlan interface by using ‘vconfig add [interface-name] [vlan_id]‘ command syntax
· vconfig add eth0 188
· ifconfig eth0.188 192.168.188.100 netmask 255.255.255.0
· sudo gedit /etc/network/interfaces
· auto eth0.188
· iface eth0.188 inet static
· address 192.168.188.100
· netmask 255.255.255.0
· vlan-raw-device eth0
4. Remove Vlan interface
· vconfig rem eth0.188
訂閱:
意見 (Atom)