一、編輯
vi /etc/config/firewall
config zone
option name 'wan'
option network 'wan'
修改 option input ‘ACCEPT’
新增rule如下:
config rule
option name 'Open Samba on WAN'
option src 'wan'
option proto 'tcp udp'
option dest_port '137 139 445'
option target 'ACCEPT'
config redirect
option name 'wan samba'
option src 'wan'
option src_dport '137 139 445'
option dest 'lan'
option proto 'tcp udp'
================================================
二、編輯
vi /etc/samba/smb.conf.template
修改 interfaces = br-lan wan
#bind interfaces yes
以上修改完,重開機即可。
2023年1月10日 星期二

2022年12月13日 星期二
小米路由 R2D 簡易修改Samba設置
如果只修改 /etc/samba/samba.conf
重啟後便會失效。
因此修改 /etc/init.d/samba
vi /etc/init.d/samba
找到[homes] 下方,新增二筆[HDD-disk] [USB-disk]
===========================
[homes]
comment = Home Directories
browsable = no
read only = no
create mode = 0750
=============================
重啟Samba
/etc/init.d/samba restart
重啟後便會失效。
因此修改 /etc/init.d/samba
vi /etc/init.d/samba
找到[homes] 下方,新增二筆[HDD-disk] [USB-disk]
===========================
[homes]
comment = Home Directories
browsable = no
read only = no
create mode = 0750
[HDD-disk]
path = /userdisk/data
read only = no
guest ok = yes
create mask = 0777
directory mask = 0777
browseable = yes
force user = root
[USB-disk]
path = /extdisks/
read only = no
guest ok = yes
create mask = 0777
directory mask = 0777
browseable = yes
force user = root
=============================
重啟Samba
/etc/init.d/samba restart
此時Samba磁碟就會出現HDD-disk和USB-disk資料夾。
可以探訪編輯硬碟所有資料。

可以探訪編輯硬碟所有資料。

2022年12月2日 星期五
老毛子Padavan 印表機分享(HP1020)
下載HP1020驅動並上傳至路由器,
http://oleg.wl500g.info/hplj/

或是telent至路由器,wget去下載HP1020驅動至 /etc/storage/。
wget http://oleg.wl500g.info/hplj/sihp1020.dl
編輯腳本,添加下面這一行‧
cat /etc/storage/sihp1020.dl > /dev/usb/lp0

2021年3月5日 星期五
Yandex Browser -- re-add or restore Google Search
修改Yandex Browser 搜索引擎的語系。
設定>>搜索引擎設置>>新增
名稱:google.tw
關鍵字:google_zh_tw
鏈路參數設置:https://www.google.com.tw/search?q=%s

2016年1月7日 星期四
[ubuntu]install gtkterm (rs-232)
minicom之外的選擇
sudo apt-get install gtkterm
不想使用root權限的使用方法如下:
1. tty屬於“dialout”群組,比如用户名是test,
先命令查看下用户所屬的组别
groups test
2.如果没有所屬“dialout”,新增用户進去該群組
sudo gpasswd --add test dialout
3.reboot~
2015年11月11日 星期三
[Android] Nibiru H1 螢幕加入虛擬三鍵
如題,H1下方的三鍵實在不靈敏.
加入虛擬按鍵的方式如下:
1.手機需取得Root權限。
2.使用"ES檔案瀏覽器",並開啟"Root工具箱".
3.在ROOT根目錄下,開啟system文件夾內build.prop的文件.
4.編輯build.prop,在最後一行加入qemu.hw.mainkeys=0
5.儲存修改的設定並重開機即可.
6.若需要取消虛擬按鍵,把qemu.hw.mainkeys=0更改為qemu.hw.mainkeys=1
加入虛擬按鍵的方式如下:
1.手機需取得Root權限。
2.使用"ES檔案瀏覽器",並開啟"Root工具箱".
3.在ROOT根目錄下,開啟system文件夾內build.prop的文件.
4.編輯build.prop,在最後一行加入qemu.hw.mainkeys=0
5.儲存修改的設定並重開機即可.
6.若需要取消虛擬按鍵,把qemu.hw.mainkeys=0更改為qemu.hw.mainkeys=1
2015年7月9日 星期四
[Ubuntu]Test your Ubuntu computer. Ubuntu燒機軟體
安裝stress測試工具指令:
sudo apt-get install stress
stress測試項目如下:
CPU的指令參數 -c
記憶體指令參數 -m
硬碟指令參數 -d
測試時間指令參數 -t
測試1個CPU線程
stress -c 1
測試4個CPU線程
stress -c 4
使用3個程序來測試記憶體,預設1個程序為250MB(總共750MB)
stress -m 3
使用3個程序來測試記憶體,每個程序為500MB (等於1.5G的Ram)
stress -m 3 --vm-bytes 500M
使用1個程序來測試硬碟存取,預設1個程序為1GB資料存取
stress -d 1
使用2個程序來測試硬碟存取,並設定每1個程序為512MB資料存取(總共1GB)
stress -d 2 --hdd-bytes 512M
燒機測試使用4線程CPU、2個程序測試記憶體、1個程序來測試硬碟存取
stress -c 4 -m 2 -d 1
設定測試時間為一小時
stress -c 4 -m 2 -d 1 -t 3600s
stress -c 4 -m 2 -d 1 -t 60M
sudo apt-get install stress
stress測試項目如下:
CPU的指令參數 -c
記憶體指令參數 -m
硬碟指令參數 -d
測試時間指令參數 -t
測試1個CPU線程
stress -c 1
測試4個CPU線程
stress -c 4
使用3個程序來測試記憶體,預設1個程序為250MB(總共750MB)
stress -m 3
使用3個程序來測試記憶體,每個程序為500MB (等於1.5G的Ram)
stress -m 3 --vm-bytes 500M
使用1個程序來測試硬碟存取,預設1個程序為1GB資料存取
stress -d 1
使用2個程序來測試硬碟存取,並設定每1個程序為512MB資料存取(總共1GB)
stress -d 2 --hdd-bytes 512M
燒機測試使用4線程CPU、2個程序測試記憶體、1個程序來測試硬碟存取
stress -c 4 -m 2 -d 1
設定測試時間為一小時
stress -c 4 -m 2 -d 1 -t 3600s
stress -c 4 -m 2 -d 1 -t 60M
[Ubuntu] install ARP-scan
install arp-scan command:
sudo apt-get install arp-scan
arp-scan command:
sudo arp-scan --interface=eth0 192.168.168.0/24
or
sudo arp-scan 192.168.168.0/24
2015年5月23日 星期六
[Ubuntu]Ubuntu15.04的fcitx輸入法安裝嘸蝦米(boshiamy)
14.04以前的安fcitx輸入法:
sudo apt-get install fcitx
sudo apt-get install im-config
sudo add-apt-repository ppa:fcitx-team/nightly
sudo apt-get update
im-config
-------------------------------------------------------------------
嘸蝦米套件:
sudo apt-get install fcitx-table-boshiamy
新酷音:
sudo apt-get install fcitx-chewing
向ibus說byebye~~~~
sudo apt-get remove ibus
sudo apt-get install unity-control-center
sudo apt-get install fcitx
sudo apt-get install im-config
sudo add-apt-repository ppa:fcitx-team/nightly
sudo apt-get update
im-config
-------------------------------------------------------------------
嘸蝦米套件:
sudo apt-get install fcitx-table-boshiamy
新酷音:
sudo apt-get install fcitx-chewing
向ibus說byebye~~~~
sudo apt-get remove ibus
sudo apt-get install unity-control-center
2015年5月22日 星期五
Ubuntu 14.04.2 Server + BIND DNS Server + SIP DNS SRV settings
step 1.
Download Ubuntu Server 14.04.2 and install this system.
http://www.ubuntu.com/download/server
Installation process
To select the “DNS Server” service function.
step 2.
Install Webmin On Ubuntu 14.04 LTS using official repository
step 3.
使用 Webmin方式來設定DNS Server
設定 Bind 8 可以接受外部連線及轉送查詢的伺服器。
forwarders {
163.168.168.59; //base DNS IP
8.8.8.8; //google DNS IP
};
allow-query {
any;
};

設定區域預設值

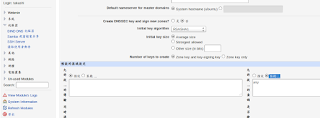
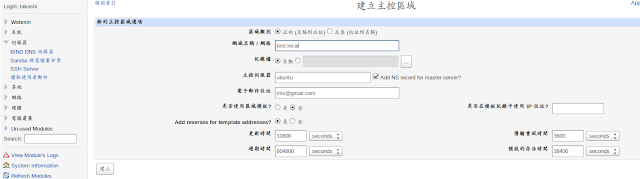
建立一個新的主控區域-正向
輸入管理網域名稱 test.local
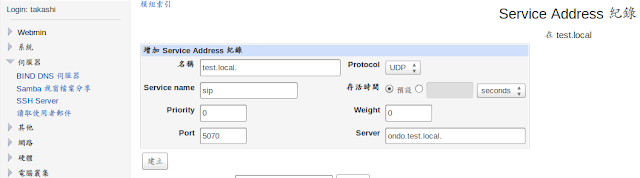
建立 Address 紀錄(位址)

增加 Address 紀錄
step 4.
使用nslookup指令查詢
nslookup
server "DNS Server IP"
set type=srv
_sip._udp.test.local

Download Ubuntu Server 14.04.2 and install this system.
http://www.ubuntu.com/download/server
Installation process
To select the “DNS Server” service function.
step 2.
Install Webmin On Ubuntu 14.04 LTS using official repository
Add the webmin official repository:
Edit file /etc/apt/sources.list,
sudo nano /etc/apt/sources.list
Add the following lines:
deb http://download.webmin.com/download/repository sarge contrib
deb http://webmin.mirror.somersettechsolutions.co.uk/repository sarge contrib
Add the GPG key:
sudo wget http://www.webmin.com/jcameron-key.asc
sudo apt-key add jcameron-key.asc
Update the sources list:
sudo apt-get update
Install webmin using the following command:
sudo apt-get install webmin
Allow the webmin default port “10000” via firewall, if you want to access the webmin console from a remote system.
sudo ufw allow 10000
Access Webmin console
Open up your browser and navigate to the URL https://ip-address:10000/. The following screen should appear. Enter the user name and password to log in to webmin console.
step 3.
使用 Webmin方式來設定DNS Server
設定 Bind 8 可以接受外部連線及轉送查詢的伺服器。
「伺服器」->「BIND 8 DNS 伺服器」->「Edit Config File」->/etc/bind/named.conf.options 在此檔中加入 listen-on port 53 { any; }; forwarders {
163.168.168.59; //base DNS IP
8.8.8.8; //google DNS IP
};
allow-query {
any;
};

設定區域預設值
「伺服器」->「BIND 8 DNS 伺服器」->「區域預設值」 「預設的區域設定」->「允許從 ... 的查詢」點擊「監聽」及輸入 [any]
建立一個新的主控區域-正向
輸入管理網域名稱 test.local

建立 Address 紀錄(位址)

增加 Address 紀錄

step 4.
使用nslookup指令查詢
nslookup
server "DNS Server IP"
set type=srv
_sip._udp.test.local

2015年3月25日 星期三
[office] libreoffice Calc 工作表字體太小
修改主题的gtkrc文件。
比如:
sudo gedit /usr/share/themes/elementary/gtk-2.0/gtkrc
找到GtkScrollbar ::slider-width,
修改成適合的值。
如原先是6,我改為18後.儲存檔案退出,
重新開啟libreoffice Calc,此時下方的工作表字體便會放大。
比如:
sudo gedit /usr/share/themes/elementary/gtk-2.0/gtkrc
找到GtkScrollbar ::slider-width,
修改成適合的值。
如原先是6,我改為18後.儲存檔案退出,
重新開啟libreoffice Calc,此時下方的工作表字體便會放大。
| style "murrine-default" { GtkScrollbar ::has-backward-stepper = 0 GtkScrollbar ::has-forward-stepper = 0 GtkScrollbar ::min-slider-length = 30 GtkScrollbar ::slider-width = 18 GtkScrollbar ::trough-border = 1 |
訂閱:
文章 (Atom)