安裝stress測試工具指令:
sudo apt-get install stress
stress測試項目如下:
CPU的指令參數 -c
記憶體指令參數 -m
硬碟指令參數 -d
測試時間指令參數 -t
測試1個CPU線程
stress -c 1
測試4個CPU線程
stress -c 4
使用3個程序來測試記憶體,預設1個程序為250MB(總共750MB)
stress -m 3
使用3個程序來測試記憶體,每個程序為500MB (等於1.5G的Ram)
stress -m 3 --vm-bytes 500M
使用1個程序來測試硬碟存取,預設1個程序為1GB資料存取
stress -d 1
使用2個程序來測試硬碟存取,並設定每1個程序為512MB資料存取(總共1GB)
stress -d 2 --hdd-bytes 512M
燒機測試使用4線程CPU、2個程序測試記憶體、1個程序來測試硬碟存取
stress -c 4 -m 2 -d 1
設定測試時間為一小時
stress -c 4 -m 2 -d 1 -t 3600s
stress -c 4 -m 2 -d 1 -t 60M
2015年7月9日 星期四

[Ubuntu] install ARP-scan
install arp-scan command:
sudo apt-get install arp-scan
arp-scan command:
sudo arp-scan --interface=eth0 192.168.168.0/24
or
sudo arp-scan 192.168.168.0/24
2015年5月23日 星期六
[Ubuntu]Ubuntu15.04的fcitx輸入法安裝嘸蝦米(boshiamy)
14.04以前的安fcitx輸入法:
sudo apt-get install fcitx
sudo apt-get install im-config
sudo add-apt-repository ppa:fcitx-team/nightly
sudo apt-get update
im-config
-------------------------------------------------------------------
嘸蝦米套件:
sudo apt-get install fcitx-table-boshiamy
新酷音:
sudo apt-get install fcitx-chewing
向ibus說byebye~~~~
sudo apt-get remove ibus
sudo apt-get install unity-control-center
sudo apt-get install fcitx
sudo apt-get install im-config
sudo add-apt-repository ppa:fcitx-team/nightly
sudo apt-get update
im-config
-------------------------------------------------------------------
嘸蝦米套件:
sudo apt-get install fcitx-table-boshiamy
新酷音:
sudo apt-get install fcitx-chewing
向ibus說byebye~~~~
sudo apt-get remove ibus
sudo apt-get install unity-control-center
2015年5月22日 星期五
Ubuntu 14.04.2 Server + BIND DNS Server + SIP DNS SRV settings
step 1.
Download Ubuntu Server 14.04.2 and install this system.
http://www.ubuntu.com/download/server
Installation process
To select the “DNS Server” service function.
step 2.
Install Webmin On Ubuntu 14.04 LTS using official repository
step 3.
使用 Webmin方式來設定DNS Server
設定 Bind 8 可以接受外部連線及轉送查詢的伺服器。
forwarders {
163.168.168.59; //base DNS IP
8.8.8.8; //google DNS IP
};
allow-query {
any;
};

設定區域預設值

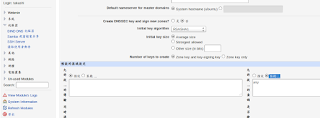
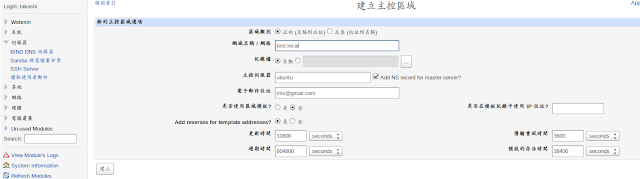
建立一個新的主控區域-正向
輸入管理網域名稱 test.local
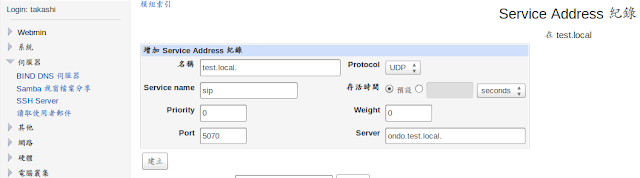
建立 Address 紀錄(位址)

增加 Address 紀錄
step 4.
使用nslookup指令查詢
nslookup
server "DNS Server IP"
set type=srv
_sip._udp.test.local

Download Ubuntu Server 14.04.2 and install this system.
http://www.ubuntu.com/download/server
Installation process
To select the “DNS Server” service function.
step 2.
Install Webmin On Ubuntu 14.04 LTS using official repository
Add the webmin official repository:
Edit file /etc/apt/sources.list,
sudo nano /etc/apt/sources.list
Add the following lines:
deb http://download.webmin.com/download/repository sarge contrib
deb http://webmin.mirror.somersettechsolutions.co.uk/repository sarge contrib
Add the GPG key:
sudo wget http://www.webmin.com/jcameron-key.asc
sudo apt-key add jcameron-key.asc
Update the sources list:
sudo apt-get update
Install webmin using the following command:
sudo apt-get install webmin
Allow the webmin default port “10000” via firewall, if you want to access the webmin console from a remote system.
sudo ufw allow 10000
Access Webmin console
Open up your browser and navigate to the URL https://ip-address:10000/. The following screen should appear. Enter the user name and password to log in to webmin console.
step 3.
使用 Webmin方式來設定DNS Server
設定 Bind 8 可以接受外部連線及轉送查詢的伺服器。
「伺服器」->「BIND 8 DNS 伺服器」->「Edit Config File」->/etc/bind/named.conf.options 在此檔中加入 listen-on port 53 { any; }; forwarders {
163.168.168.59; //base DNS IP
8.8.8.8; //google DNS IP
};
allow-query {
any;
};

設定區域預設值
「伺服器」->「BIND 8 DNS 伺服器」->「區域預設值」 「預設的區域設定」->「允許從 ... 的查詢」點擊「監聽」及輸入 [any]
建立一個新的主控區域-正向
輸入管理網域名稱 test.local

建立 Address 紀錄(位址)

增加 Address 紀錄

step 4.
使用nslookup指令查詢
nslookup
server "DNS Server IP"
set type=srv
_sip._udp.test.local

2015年3月25日 星期三
[office] libreoffice Calc 工作表字體太小
修改主题的gtkrc文件。
比如:
sudo gedit /usr/share/themes/elementary/gtk-2.0/gtkrc
找到GtkScrollbar ::slider-width,
修改成適合的值。
如原先是6,我改為18後.儲存檔案退出,
重新開啟libreoffice Calc,此時下方的工作表字體便會放大。
比如:
sudo gedit /usr/share/themes/elementary/gtk-2.0/gtkrc
找到GtkScrollbar ::slider-width,
修改成適合的值。
如原先是6,我改為18後.儲存檔案退出,
重新開啟libreoffice Calc,此時下方的工作表字體便會放大。
| style "murrine-default" { GtkScrollbar ::has-backward-stepper = 0 GtkScrollbar ::has-forward-stepper = 0 GtkScrollbar ::min-slider-length = 30 GtkScrollbar ::slider-width = 18 GtkScrollbar ::trough-border = 1 |
2015年3月4日 星期三
[Ubuntu] Install Intel Graphics Installer ver 1.0.7 in 14.10.
Intel(R) Graphics Installer for Linux* 1.0.7
https://01.org/linuxgraphics/downloads/2014/intelr-graphics-installer-linux-1.0.7“Distribution not supported” in 14.10
That software checks
/etc/lsb-release and that is a text file we can edit ourself so it might be fairly easy to circumvent. Make a backup first though if you do not know what this means. From a command line:sudo cp /etc/lsb-release /etc/lsb-release.backup
And then edit the file ...
sudo gedit /etc/lsb-release
And change the lines that look like
DISTRIB_RELEASE=14.10
DISTRIB_CODENAME=utopic
with ...
DISTRIB_RELEASE=14.04
DISTRIB_CODENAME=trusty
And save it. Start the installation and it should finish this time without a notice regarding the distribution.
After that you can then put back the backup file with (
cp to leave the backup, change it to mv to also remove the backup)...sudo cp /etc/lsb-release.backup /etc/lsb-release ============================================================================
Instructions for 32 bit systems:
$ wget --no-check-certificate https://download.01.org/gfx/RPM-GPG-KEY-ilg -O - | sudo apt-key add -

$ sudo apt-get update

$ wget
https://download.01.org/gfx/ubuntu/14.04/main/pool/main/i/intel-linux-graphics-installer/intel-linux-graphics-installer_1.0.7-0intel1_i386.deb

$ sudo gdebi intel-linux-graphics-installer_1.0.7-0intel1_i386.deb
Instructions for 64 bit systems:
$ wget --no-check-certificate https://download.01.org/gfx/RPM-GPG-KEY-ilg -O - | sudo apt-key add -

$ sudo apt-get update

$ wget
https://download.01.org/gfx/ubuntu/14.04/main/pool/main/i/intel-linux-graphics-installer/intel-linux-graphics-installer_1.0.7-0intel1_amd64.deb

$ sudo gdebi intel-linux-graphics-installer_1.0.7-0intel1_amd64.deb
To start the Intel Linux Graphics Installer, on both 32 bit and 64 bit Ubuntu systems, open a terminal and type:$ sudo intel-linux-graphics-installer 2015年1月9日 星期五
[Network]IPv6 Support for Http File Server (HFS)
If you want to have access to HFS site via IPV6 you can use next hack:
1. Download relay6 from http://sourceforge.net/projects/relay6/files/
2. Unpack to some folder (e.g. C:\relay6)
3. Start it with next command from cmd
1. Download relay6 from http://sourceforge.net/projects/relay6/files/
2. Unpack to some folder (e.g. C:\relay6)
3. Start it with next command from cmd
| C:\>C:\relay6\relay6.exe 80 127.0.0.1 80 /b:"YourIPv6 Address" |
2015年1月7日 星期三
[Ubuntu]ACER TravelMate 3000 Wubi install Ubuntu 14.04.1
1.開始->執行->cmd
指令輸入convert c: /fs:ntfs
指令輸入convert c: /fs:ntfs
C:從FAT32轉到NTFS
2.下载ubuntu-14.04.1-desktop-i386.iso
3.掛載該ISO檔
4.win+R 執行“X:\wubi.exe --force-wubi --32bit“
5.進入WUBI安裝程序
6.安裝完成後,進入Ubuntu啟動選單時,選擇 *Ubuntu 後,按鍵盤上的 E 鍵,進入啟動編輯模式
7.
把ro 改成 rw 後,按 F10 鍵,便可修改參數進入系統loop=/ubuntu/disks/root.disk ro loop=/ubuntu/disks/root.disk rw
8.進入系統後,Ctrl + T
輸入 sudo gedit /etc/grub.d/10_lupin
9.gedit 編輯下搜尋 ro ${args} 字串
並把ro 改成 rw 後,儲存離開。
10.輸入 sudo update-grub 後,即可重新開機。
2014年12月28日 星期日
[Ubuntu] xrandr set screen panning in netbook(ASUS 1015PE)
ASUS Netbook 1015PE LCD 10" 1024x600
-----------------------------------------------------------
set to 1280x720 command:
#xrandr --output LVDS1 --mode 1024x600 --fb 1280x720 --panning 1280x720 --scale 1.25x1.2
set to 1280x768 command:
#xrandr --output LVDS1 --mode 1024x600 --fb 1280x768 --panning 1280x768 --scale 1.25x1.28
set to 1366x768 command:
#xrandr --output LVDS1 --mode 1024x600 --fb 1366x768 --panning 1366x768 --scale 1.33398x1.28
set to 1440x900 command:
#xrandr --output LVDS1 --mode 1024x600 --fb 1440x900 --panning 1440x900 --scale 1.40625x1.5
set to 1600x900 command:
#xrandr --output LVDS1 --mode 1024x600 --fb 1600x900 --panning 1600x900 --scale 1.5625x1.5
set to 1980x1080 command:
#xrandr --output LVDS1 --mode 1024x600 --fb 1980x1080 --panning 1980x1080 --scale 1.9335x1.8
==========================================================
modify /etc/rc.local
add screen panning command.
startup autorun scripts
But for a user script these should be launched as session scripts by gnome! Have a look under System > Preferences > Startup Applications.
add autorun /etc/rc.local
Pls Reboot.
-----------------------------------------------------------
set to 1280x720 command:
#xrandr --output LVDS1 --mode 1024x600 --fb 1280x720 --panning 1280x720 --scale 1.25x1.2
set to 1280x768 command:
#xrandr --output LVDS1 --mode 1024x600 --fb 1280x768 --panning 1280x768 --scale 1.25x1.28
set to 1366x768 command:
#xrandr --output LVDS1 --mode 1024x600 --fb 1366x768 --panning 1366x768 --scale 1.33398x1.28
set to 1440x900 command:
#xrandr --output LVDS1 --mode 1024x600 --fb 1440x900 --panning 1440x900 --scale 1.40625x1.5
set to 1600x900 command:
#xrandr --output LVDS1 --mode 1024x600 --fb 1600x900 --panning 1600x900 --scale 1.5625x1.5
set to 1980x1080 command:
#xrandr --output LVDS1 --mode 1024x600 --fb 1980x1080 --panning 1980x1080 --scale 1.9335x1.8
==========================================================
modify /etc/rc.local
add screen panning command.
| #!/bin/sh -e # # rc.local # # This script is executed at the end of each multiuser runlevel. # Make sure that the script will "exit 0" on success or any other # value on error. # # In order to enable or disable this script just change the execution # bits. # # By default this script does nothing. xrandr --output LVDS1 --mode 1024x600 --fb 1280x768 --panning 1280x768 --scale 1.25x1.28 exit 0 |
startup autorun scripts
But for a user script these should be launched as session scripts by gnome! Have a look under System > Preferences > Startup Applications.
add autorun /etc/rc.local
Pls Reboot.
[Ubuntu] Asus Fn+F3 touchpad toggle doesn't work
mkdir ~/bin
gedit ~/bin/toggletouchpad.sh
#!/bin/bash
if [ $(synclient -l | grep TouchpadOff | awk '{print $3}') == 1 ] ; then
  synclient touchpadoff=0;
else
 synclient touchpadoff=1;
fi
|
chmod +x ~/bin/toggletouchpad.sh
~/bin/toggletouchpad.sh
-------------------------------------------------------------------------------------------------
Go to Settings Manager -> Keyboard -> Application shortcuts and
create an Fn+F3 shortcut to point to /home/USER/bin/toggletouchpad.sh
(replace USER with your actual username) and test the Fn+F3 combination.
2014年12月26日 星期五
[Android] FreeScale i.MX6DL SABRE platform pre-built Android 4.4.2 image.
2.Downloaded and unzipped the MFG tool (Mfgtools-Rel-13.01.00_ER_MX6DL_UPDATER)
3.Created "android" directory under MFGTool-Dir/Profiles/MX6Q Linux Update/OS Firmware/files
4.Copied the following files from android_jb4.2.2_1.0.0-ga_image_6qsabresd.tar.gz to the MFGTool-Dir/Profiles/MX6Q Linux Update/OS Firmware/files/android/ directory.
u-boot-6dl.bin
SD/boot.img
SD/system.img
SD/recovery.img
5.Changed the SABRE-SD SW6 (boot) to 00001100 to enter download mode Updated the MFGTool-Dir/cfg.ini file so that
| [profiles]
chip = MX6DL Linux Update [platform] board = SabreSD [LIST] name = Android-SabreSD-SD |
7.Run MfgTool2.exe.
8.Development board connected to the power supply, the following "HID-compliant device", click "Start" to start the download.
9.After the download is complete. Turn off the power development board.
Changed the SW6 (boot) to 01000010 to enter SD-card boot mode.
============================================================================
1.Downloaded and unzipped the image (android_kk4.4.2_1.0.0-ga_full_image_6qsabresd)
2.Downloaded and unzipped the MFG tool (Mfgtools-Rel-13.01.00_ER_MX6DL_UPDATER)
3.Created "android" directory under MFGTool-Dir/Profiles/MX6Q Linux Update/OS Firmware/files
4.Copied the following files from android_jb4.2.2_1.0.0-ga_image_6qsabresd.tar.gz to the MFGTool-Dir/Profiles/MX6Q Linux Update/OS Firmware/files/android/ directory.
u-boot-6dl.bin
eMMC/boot.img
eMMC/system.img
eMMC/recovery.img
5.Changed the SABRE-SD SW6 (boot) to 00001100 to enter download mode Updated the MFGTool-Dir/cfg.ini file so that
| [profiles]
chip = MX6DL Linux Update [platform] board = SabreSD [LIST] name = Android-SabreSD-eMMC |
6.OTG-USB cable connected to the motherboard and computer.
7.Run MfgTool2.exe.
8.Development board connected to the power supply, the following "HID-compliant device", click "Start" to start the download.
9.After the download is complete. Turn off the power development board.
Changed the SW6 (boot) to 11010110 to enter eMMC boot mode.
訂閱:
文章 (Atom)